About
EU VAT Validation for Opencart 2.0.0
In version 2.0 of Opencart, the option to validate a customer's VAT number is no longer available. This extension aims to fill that void (and more!).
Within the EU VAT zone, intra-Community supplies of goods are exempt from VAT in the Member State of dispatch when they are made to a registered company in another Member State who will account for the VAT on arrival. More info
Without proper verification that your customer is indeed a legitimate company with a valid and active VAT number, you risk ending up getting charged for the exempt VAT yourself by your local tax collector. Malicious individuals might pretend to be a registered company to avoid paying VAT. With this extension, instead of having to manually verify the validity of the VAT number for each new customer, this dull but important task is automatically done for you.
VAT number custom field with validation
In essence, this extension adds a 'VAT number' custom field to the registation form and checkout form (both registration & guest). Values entered in this field will be automatically checked against the VIES EU VAT number database. It is possible to enable/disable the validation per customer group. What's more, while customers located outside of the EU VAT zone still have the ability to enter a VAT number or ID (eg. South Africa, Canada, ...), the input value does not have to validate to complete the registration or checkout process. So effectively, the 'VAT number' custom field is only a required field for EU customers.
This extension is essential if your webshop aims to sell to professional customers within the EU VAT zone. Additionally, if your webshop targets both individual and professional customers, inside or outside the EU VAT zone, this extension will make your life a lot easier.
VAT number validation
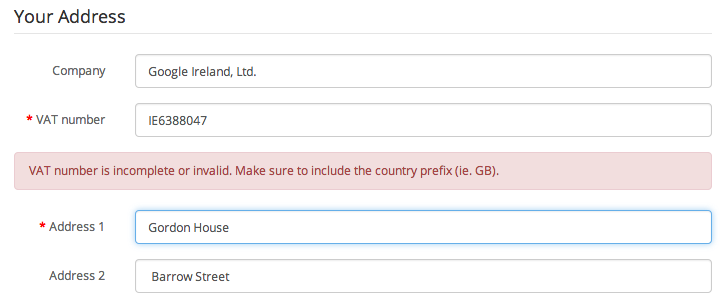
On the front-end, VAT validation is available anywhere the custom 'VAT number' field is displayed: on the registration form, and the checkout form (both registration and guest). Validation occurs automatically when the field looses focus (with AJAX) and on form submit.
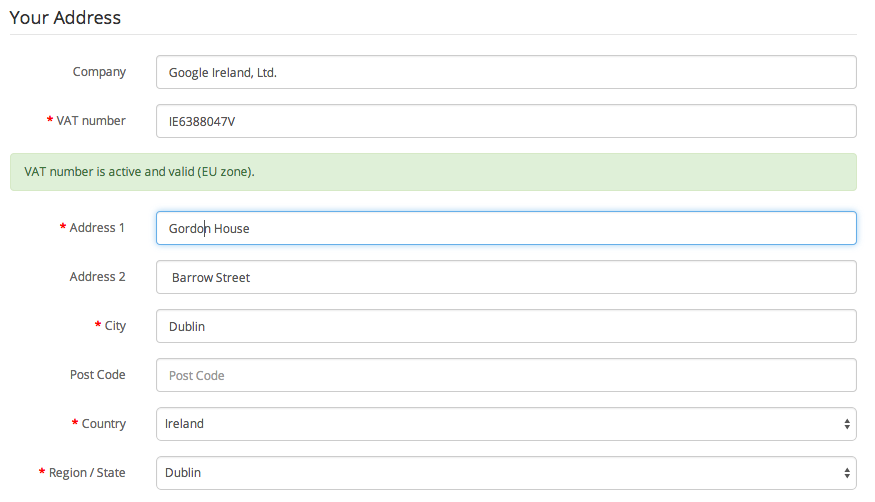
When the VAT number is invalid, a message is displayed to alert the customer.
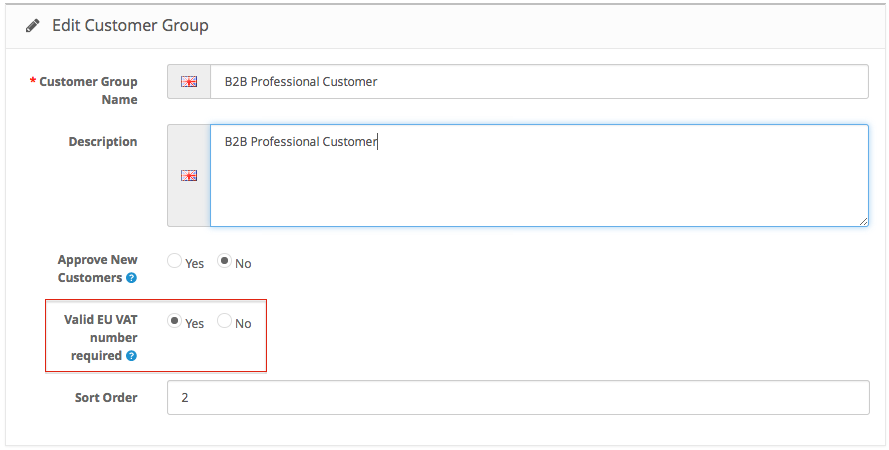
If the selected country is inside the EU VAT zone and the 'valid EU VAT number required' option is enabled for the selected customer group, the 'VAT number' has to be valid for the form to validate, effectively blocking the transaction.

VAT Validation in backend administration
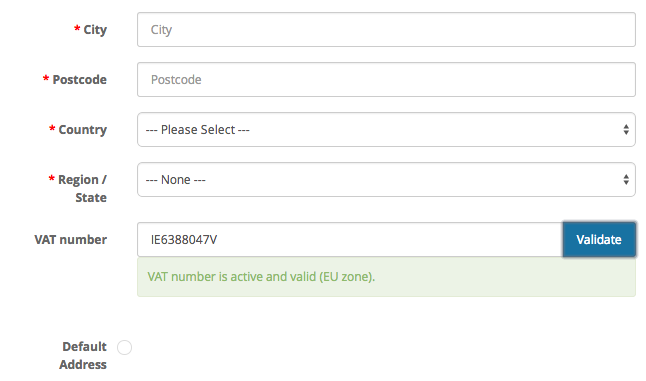
For your convenience, VAT number validation is also available when creating a new customer in the backend. Click the 'Validate' button to the right of the 'VAT number' field to check the VAT number.
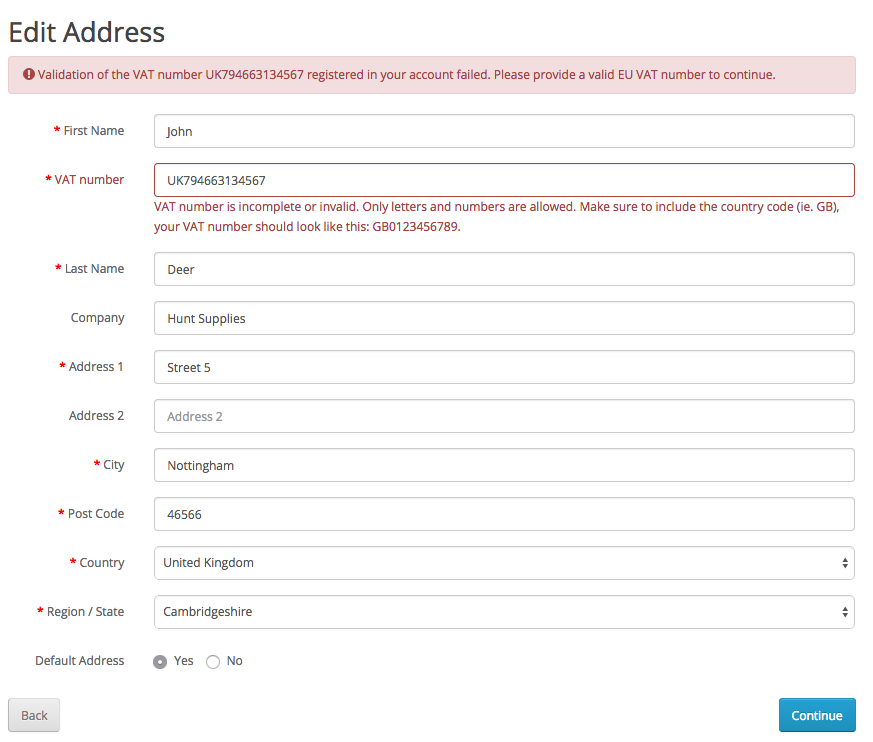
Registered Customers VAT number validation
Registered customers whose VAT number is no longer valid, will not be able to complete the checkout. Instead, they are redirected to the 'Edit Address' page where they are asked to correct their registered VAT number or provide a new one. Only when a valid VAT number is provided can they continue the checkout process.
Installation
Installing the EU VAT Validation module
Installation of this extension is very simple. There are two ways you can install the module.
With the Extension Installer
Old-school Opencart module installation (Recommended)
Download the extension .zip file from the Opencart Extension platform and upload the .ocmod.zip located in the OCMOD folder with the built-in Extension Installer.
Next, navigate to Extensions >> Modifications and refresh the modifications cache by clicking thebutton.
Download the extension .zip file from the Opencart Extension platform. Next, make sure you have vQmod v2.5.1 installed.
Upload the contents of the 'upload' folder to the root of your Opencart installation.
(typically the 'public_html' or 'htdocs' folder on your webhost)
Now navigate to 'Extensions >> Modules', scroll to down to the EU VAT Validation module and click the  button to install the extension. Done!
Now start configurating the EU VAT Validation module.
Configuration
Configuring the EU VAT Validation module
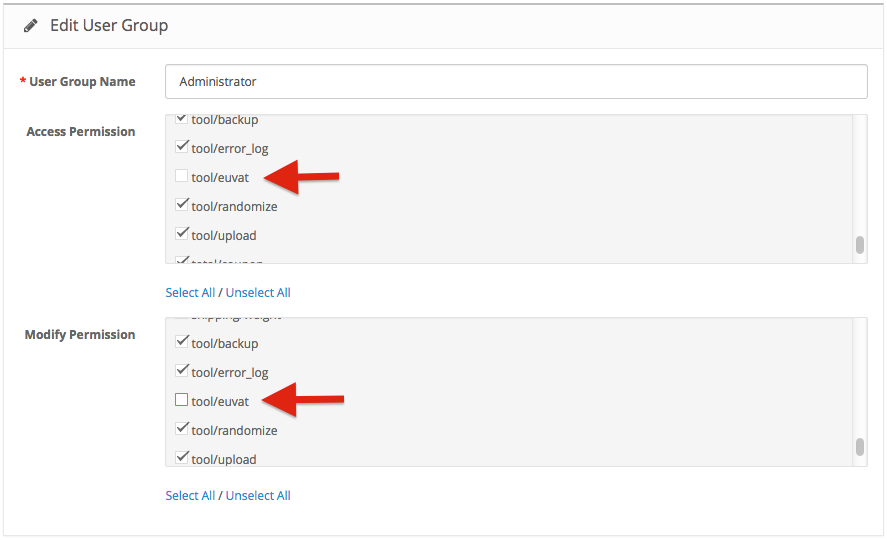
Navigate to System >> Users >> User Groups and click the  button next to the User Group that should be able to access and modify the EU VAT Validation module (typically Top Administrator).
Scroll down to 'tool/euvat' and activate the checkbox, or click 'select all'. Repeat twice (Access & Modify permissions).
Setting up VAT Rates and Classes for Intra-community supplies with VAT exempt
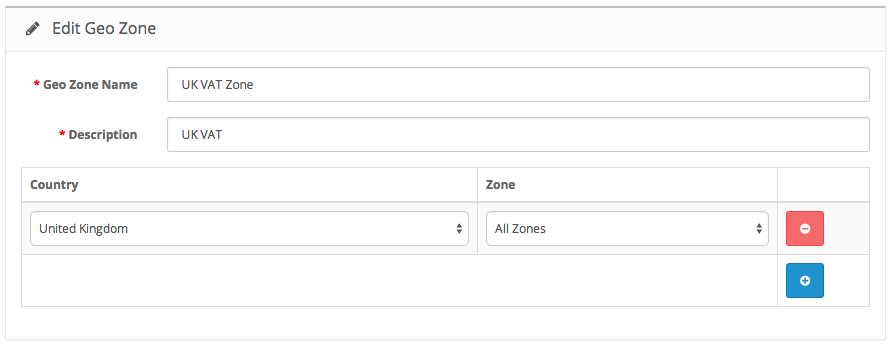
Navigate to System >> Geozones and create a new geo zone for your country.
Click the  button to create a new geo zone.
Click the  button to save the new geo zone
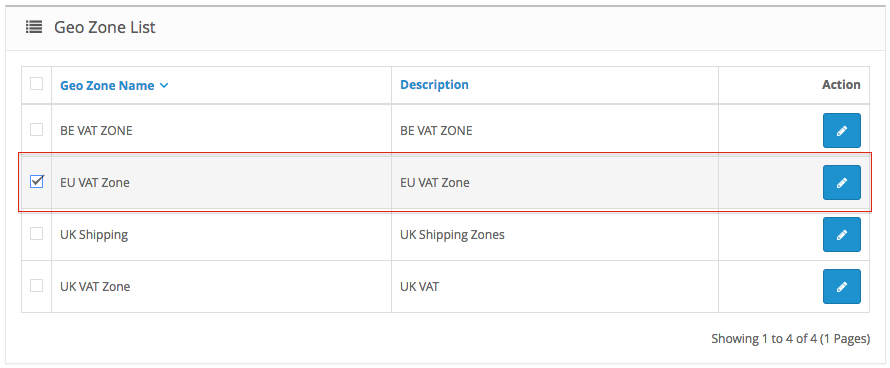
Also notice the EU VAT, that was created during the installation.
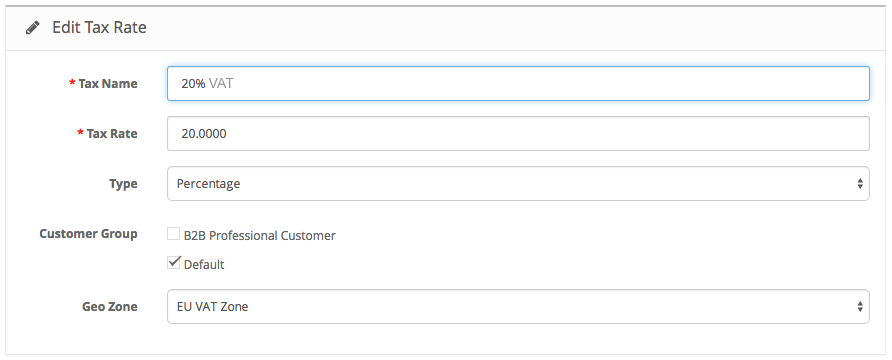
Next, navigate to System >> Localisation >> Taxes >> Tax Rates. Here, set up the VAT rates that apply to your country.
Click the button to create a new tax rate.
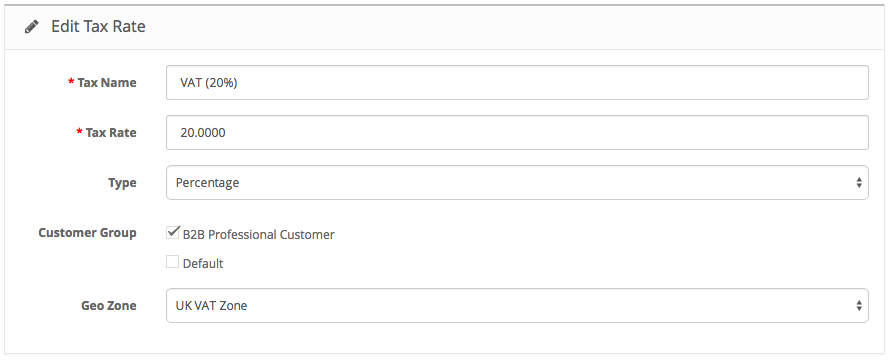
Then create a duplicate of the Tax Rate you just added, but now select the EU VAT zone, and only the default customer group (or the customer group that represent end-user customers)
We are now almost finished. Finally, navigate to System >> Localisation >> Taxes >> Tax Classes and create a new Tax Class by clicking the button. Now add the Tax Rates you created in the previous steps, and set 'Based On' to Shipping Address for both.
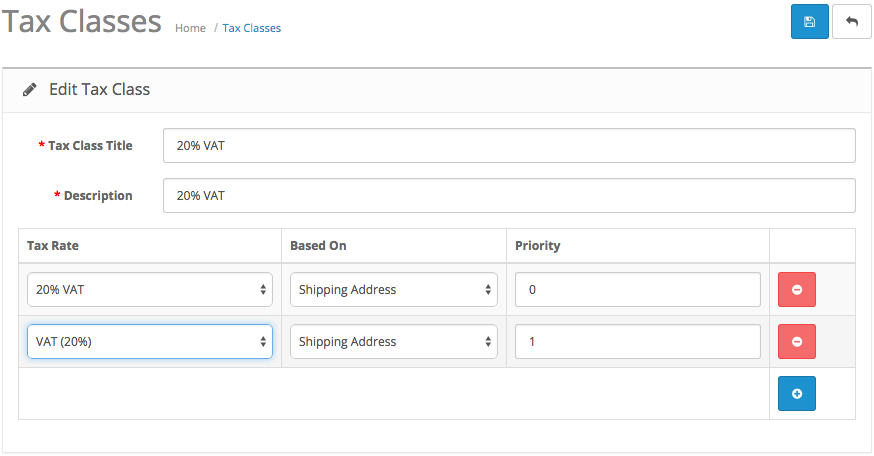
Click the button to save the new Tax Class
To summarise the tax configuration we just set up:
- Professional customers located in your country (shipping address) will be charged the local VAT rate.
- Professional customers from outside your country (shipping address) will be not be charged any VAT.
- Individual end-user customers located within the EU VAT zone (shipping address) will be charged the local VAT rate.
- Individual end-user customers located outside the EU VAT zone (shipping address) will not be charged any VAT.
Just one more thing
Navigate to System >> Settings and under 'Options' change 'Use Store Tax Address' to 'Shipping Address' and 'Use Customer Tax Address' to 'Shipping Address'. Alternatively, if your shop only targets professional customers, set both to '--- None ---'.

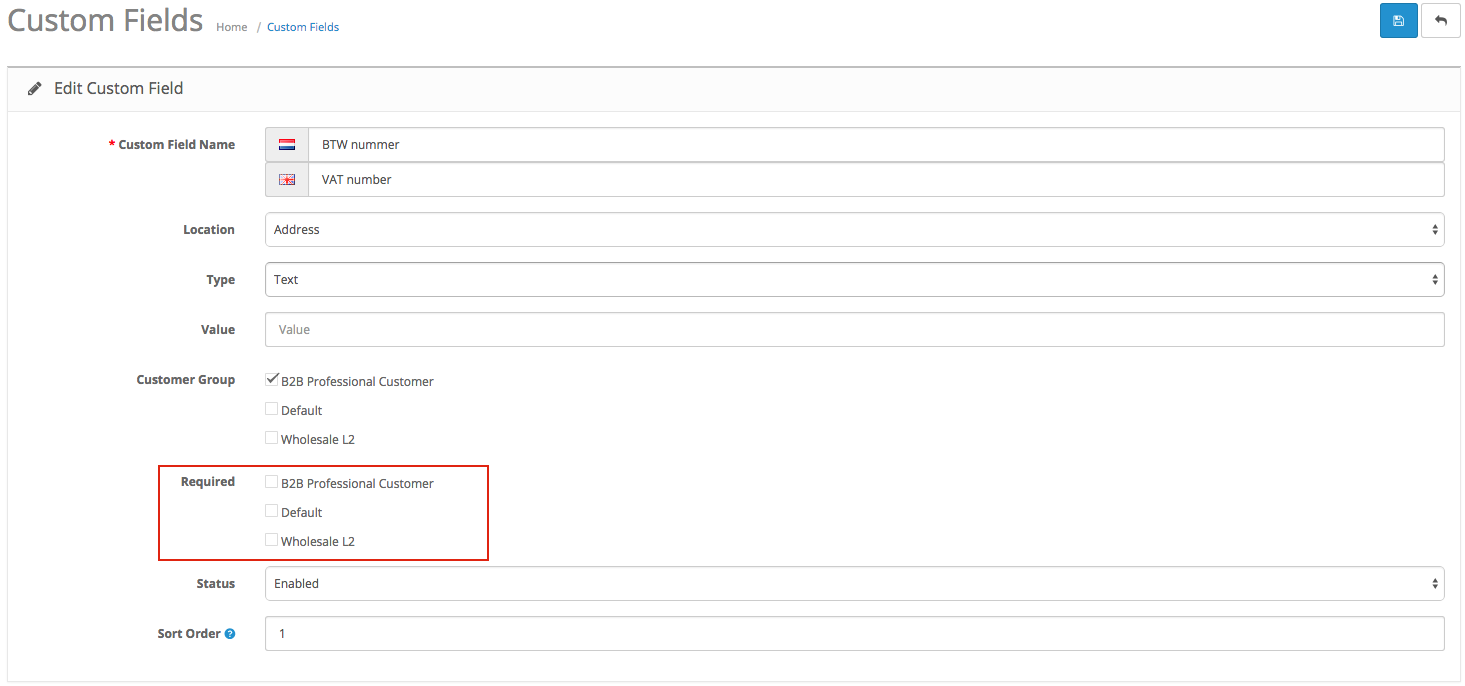
When editing the custom field, make sure NOT to make it 'required'. Otherwise, customers based outside the EU will not be able to complete the registration and checkout (Non EU customers typically don't have a VAT number). The extension will require the VAT number custom field intelligently, only for customers registering with an address located within the EU.
Translation
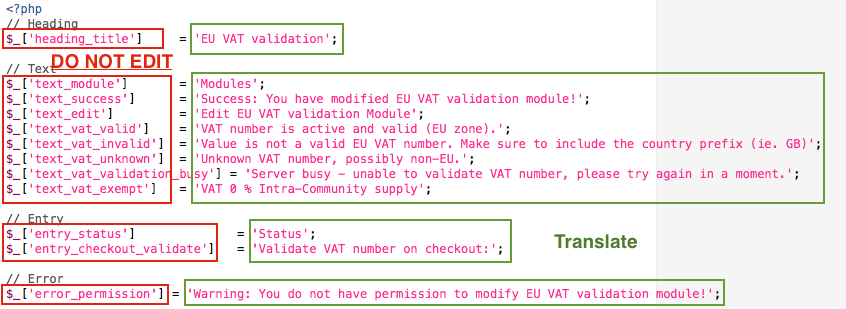
Translating the EU VAT Validation module
Default language files for English are provided with the extension. If you have different languages active in your webshop, you can translate the language files. The language files for this extension are located in two folders on your webhost:
- {the Opencart root folder}/admin/language/english/module/euvat
- {the Opencart root folder}/catalog/language/english/tool/euvat
Copy the euvat.php language file to the language folder of the language you want to translate to. Make sure the file path remains the same:
- {the Opencart root folder}/admin/language/{language name}/module/euvat
- {the Opencart root folder}/catalog/language/{language name}/tool/euvat
After creating the new files, you can edit these with a simple text editor (use Notepad, not Word!). Only translate the text after the equal sign and between ''.
Do not change the variable names, as this will screw thing up.
When you are done, simply save the file (Ctrl + S).
Support
No support is provided for this extension.